มาปลุกพลัง Stand ระยะใกล้ สร้าง Server แบบเทพด้วย Nginx + PHP 8.4 + WordPress + WooCommerce เสริมเกราะ SSL + ความเร็วด้วย Redis + Autoptimize พร้อมระบบส่งเมลด้วย Postfix – แบบละเอียดทุกขั้นตอน

ติดตั้ง Nginx + WordPress | Zero to Hero Linux Master ปลุกพลัง Stand ระยะใกล้ สร้าง Host Server อันทรงพลัง!
“Stand ระยะใกล้มีพลังทำลายสูง! และเมื่อรวมกับทักษะ Network Engineer – ก็พร้อมทะลวงไปหาเงินทั่วโลก!”
ยุคที่ AI แย่งงาน… คนที่มี Stand เป็นของตัวเองเท่านั้นที่จะอยู่รอด! วันนี้เราจะมาสร้างเซิร์ฟเวอร์แบบเทพ ที่ติดตั้ง WordPress + WooCommerce บน Nginx ด้วย PHP 8.4 พร้อม SSL จาก Let’s Encrypt, Redis Cache, Autooptimize และความปลอดภัย Login แบบมือโปร รวมถึงส่งอีเมลด้วย Postfix
1. เตรียม VPS ให้พร้อม
sudo apt update && sudo apt upgrade -y
2. ติดตั้ง Nginx
sudo apt install nginx -y
sudo systemctl start nginx
sudo systemctl enable nginx
3. ติดตั้ง PHP 8.4 และโมดูลที่จำเป็น
sudo add-apt-repository ppa:ondrej/php -y
sudo apt update
sudo apt install php8.4 php8.4-fpm php8.4-mysql php8.4-curl php8.4-xml php8.4-mbstring php8.4-zip -y
sudo nano /etc/php/8.4/fpm/php.ini
4. ติดตั้ง MySQL และสร้างฐานข้อมูล
sudo apt install mysql-server -y
sudo mysql_secure_installation
หรือติดตั้ง mariadb
sudo apt install mariadb-server mariadb-client -y
sudo apt install phpmyadmin
สร้างฐานข้อมูล WordPress:
CREATE DATABASE stand_site;
CREATE USER 'jolyne'@'localhost' IDENTIFIED BY 'StoneFree84';
GRANT ALL PRIVILEGES ON stand_site.* TO 'jolyne'@'localhost';
FLUSH PRIVILEGES;
5. ดาวน์โหลด WordPress
cd /var/www/
sudo wget https://wordpress.org/latest.tar.gz
sudo tar -xvzf latest.tar.gz
sudo mv wordpress standsite
sudo chown -R $USER:$USER standsite
sudo chmod -R 755 standsite
sudo chown -RF www-data:www-data standsite
6. สร้าง Nginx Block พร้อมรองรับ SSL และ Powerful Cache แบบ WP Rocket
สร้างไฟล์ Block:
sudo nano /etc/nginx/sites-available/standsite
server {
    listen 80;
    server_name yourdomain.com www.yourdomain.com;
    return 301 https://$host$request_uri;
}

server {
    listen 443 ssl http2;
    server_name yourdomain.com www.yourdomain.com;

    root /var/www/standsite;
    index index.php index.html;

    ssl_certificate /etc/letsencrypt/live/yourdomain.com/fullchain.pem;
    ssl_certificate_key /etc/letsencrypt/live/yourdomain.com/privkey.pem;
    include /etc/letsencrypt/options-ssl-nginx.conf;
    ssl_dhparam /etc/letsencrypt/ssl-dhparams.pem;

    set $cache_uri $request_uri;

    if ($request_method = POST) {
        set $cache_uri 'null cache';
    }
    if ($query_string != "") {
        set $cache_uri 'null cache';
    }
    if ($request_uri ~* "/wp-admin/|/xmlrpc.php|/wp-login.php") {
        set $cache_uri 'null cache';
    }
    if ($http_cookie ~* "comment_author|wordpress_[a-f0-9]+|wp-postpass|wordpress_logged_in") {
        set $cache_uri 'null cache';
    }

    location / {
        try_files /wp-content/cache/nginx/$host/$cache_uri/index.html $uri $uri/ /index.php?$args;
    }

    location ~ \.php$ {
        include snippets/fastcgi-php.conf;
        fastcgi_pass unix:/run/php/php8.4-fpm.sock;
        fastcgi_cache_bypass $skip_cache;
        fastcgi_no_cache $skip_cache;
        fastcgi_cache WORDPRESS;
        fastcgi_cache_valid 60m;
        add_header X-FastCGI-Cache $upstream_cache_status;
    }

    location ~* \.(js|css|png|jpg|jpeg|gif|ico|svg|woff2?|ttf|eot|otf)$ {
        expires 30d;
        access_log off;
        log_not_found off;
    }

    location ~* /(?:uploads|files)/.*\.php$ {
        deny all;
    }

    location = /robots.txt {
        allow all;
        log_not_found off;
        access_log off;
    }

    location ~ /\.ht {
        deny all;
    }
}
เชื่อมโยงและเปิดใช้งาน:
sudo ln -s /etc/nginx/sites-available/standsite /etc/nginx/sites-enabled/
sudo nginx -t
sudo systemctl reload nginx
7. ติดตั้ง Certbot เพื่อเปิด SSL
sudo apt install certbot python3-certbot-nginx -y
sudo certbot --nginx -d yourdomain.com
8. เพิ่มพลังด้วย Redis + Autoptimize
ติดตั้ง Redis:
sudo apt install redis-server -y
sudo systemctl enable redis-server.service
ติดตั้ง Plugin ใน WordPress:
- Redis Object Cache
- Autoptimize
จากนั้นไปที่ wp-config.php ใส่:
define('WP_REDIS_HOST', '127.0.0.1');
define('WP_CACHE', true);
เพิ่ม Cache Zone ใน Nginx:
fastcgi_cache_path /var/cache/nginx/wordpress levels=1:2 keys_zone=WORDPRESS:100m inactive=60m;
fastcgi_cache_key "$scheme$request_method$host$request_uri";
สร้าง Directory:
sudo mkdir -p /var/cache/nginx/wordpress
sudo chown -R www-data:www-data /var/cache/nginx/wordpress
sudo nginx -t && sudo systemctl reload nginx
9. ป้องกัน Login ด้วย Fail2Ban
sudo apt install fail2ban -y
ตั้งค่าใน /etc/fail2ban/jail.local เพื่อบล็อก Brute Force บน wp-login.php
10. ติดตั้ง Postfix สำหรับ WordPress ส่งเมล
sudo apt install mailutils postfix -y
- เลือก “Internet Site”
- ใส่ชื่อ domain ของคุณ
ทดสอบส่งเมล:
echo "Stand Activated!" | mail -s "Test from Jolyne" your@email.com
💸 Stand ระยะใกล้ ทำเงินได้ระยะไกล
- เปิดร้านขายของ WooCommerce
- รับทำเว็บไซต์ให้ SME ในพื้นที่
- Affiliate Plugin + Theme
- จองโต๊ะ, ร้าน, บริการ, นัดหมาย
- เว็บคอร์สออนไลน์, ขายสูตรลับ Stand!
“อย่าดูถูก Stand ระยะใกล้ เพราะถ้ารู้ทาง มันจะทำเงินถึงต่างประเทศ!”
🖚 สรุป: Network Engineer ยุคใหม่ต้องมี Stand
การสร้าง Host Server เองจะช่วยให้คุณ:
- เข้าใจระบบเว็บจริงทุกชั้น
- ควบคุมความปลอดภัยด้วยตัวเอง
- ประหยัดค่าใช้จ่าย Cloud
- พร้อมขยายระบบในอนาคต
🔥 ปลุก Stand ของคุณ แล้วออกไปหาเงินแบบไร้ขีดจำกัดกัน! บทความนี้พร้อมต่อยอดสู่ระบบอัตโนมัติด้วย n8n แล้ว 🎯
มาสร้าง n8n workflow ที่ช่วยให้คุณ Auto-Deploy WordPress Site พร้อม SSL, Plugin, Cache และแจ้งเตือนสถานะการติดตั้ง ได้เลย
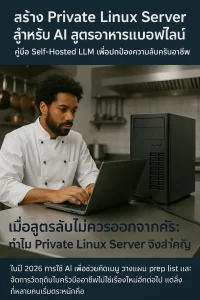
สร้าง Private Linux Server สำหรับ AI สูตรอาหารแบบออฟไลน์: คู่มือ Self-Hosted LLM เพื่อปกป้องความลับครัวมืออาชีพ
เมื่อสูตรลับไม่ควรออกจากครัว: ทำไม Private Linux Server จึงสำคัญ
ในปี 2026 การใช้ AI เพื่อช่วยคิดเมนู วางแผน prep list และจัดการวัตถุดิบในครัวมืออาชี…Read More
เขียน SOP สูตรอาหารไทยด้วย AI Automation บน Ubuntu 24.04: เปลี่ยนครัวเชิงพาณิชย์ให้กลายเป็นระบบอัตโนมัติที่คุมรสชาติได้
ในโลกของครัวเชิงพาณิชย์ ความท้าทายที่ใหญ่ที่สุดไม่ใช่แค่การทำอาหารให้อร่อย แต่คือการทำให้อร่อยเหมือนเดิมทุกครั้ง โดยเฉพาะเมนูไทยที่อาศัยความรู้สึกของคนครัวสู…
Read More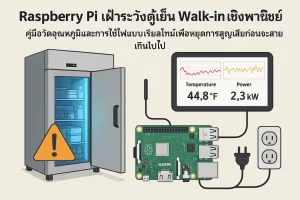
Raspberry Pi เฝ้าระวังตู้เย็น Walk-in เชิงพาณิชย์: คู่มือวัดอุณหภูมิและการใช้ไฟแบบเรียลไทม์เพื่อหยุดการสูญเสียก่อนจะสายเกินไป
ในครัวเชิงพาณิชย์ ความผิดพลาดเพียงเล็กน้อยของระบบทำความเย็นอาจแปลความหมายเป็นต้นทุนมหาศาลทันที ไม่ว่าจะเป็นอุณหภูมิแกว่งเกินจุดปลอดภัย ประตูตู้เย็นถูกเปิดค้า…
Read More
AI Molam ในปี 2030: สำรวจการกำเนิด “Cyber-Lam” เมื่อปัญญาประดิษฐ์พาเสียงอีสานก้าวสู่มรดกดิจิทัล
บทนำ: เมื่อหมอลำไม่ได้อยู่แค่บนเวที แต่ขยายไปสู่คลาวด์และโมเดล AI
หากพูดถึงอนาคตของดนตรีพื้นบ้านไทย หลายคนอาจยังนึกภาพการอนุรักษ์แบบเดิม เช่น การบันท…Read More